Showing posts with label cake. Show all posts

Monday, April 13, 2015

Carrot Cake with Cream Cheese Frosting

A carrot cake is one of my all-time favorite desserts.  It's sweet, crunchy, warm topped with a creamy cream cheese frosting - what's not to love?

Every year for the last 5 years or so, a family friend has brought us a carrot cake for Christmas.  I look forward to it every year, as she makes the best one I've ever had.  This year, husband's mom asked if there was anything I wanted them to bring from home when they came for Christmas (assuming I'd request BBQ...again).  I (half-jokingly) said "Please tell Debbie to make me a carrot cake!  The clan decided to not disappoint the brand new mamma, so Debbie baked a cake and the Alfords drove it to Boston!  What love.

This Easter, I was asked to bring a carrot cake to dinner.  I knew just who to call for a recipe.  Debbie was kind enough to share her recipe with me - and agreed to let me share it with all of you!


Ingredients

Cake
2 cups sugar
1/2 tsp baking soda
2 cups self-rising flour
2 tsp cinnamon
1 Tbsp vanilla
1.5 cups vegetable oil
3 eggs
3 cups grated carrots
1 cup roughly chopped pecans (toasted optional)

Icing
1 stick butter, softened to room temperature
8 oz cream cheese, softened
1 box (1 lb) powdered sugar
2 tsp vanilla extract
2-3 Tbsp milk (add a little at a time to get the right consistency)
Optional: 1/4 cup roughly chopped pecans (or more if desired)


Directions

Cake
Preheat oven to 350 degrees.
Cut wax paper to fit bottom of 2 round cake pans.  Grease pan & place wax paper in bottom.
Mix sugar, baking soda, flour & cinnamon in large bowl or mixer.
Make a well in the dry ingredients.  Add oil.  Add eggs 1 at a time.
Add vanilla, nuts and carrots and mix well.
Pour batter evenly into pans.
Bake for 35 to 45 minutes, testing for doneness with toothpick.
Cool in pan on rack for 10 minutes.  Flip layers onto cooling rack.

Cream Cheese Icing
Mix wet ingredients (except milk) together until smooth.
Add powdered sugar.
Add milk a little at a time until you reach desired consistency.
Optional: Stir in pecans, or sprinkle on top

Once cake has cooled, ice between the layers, top and sides of cake.

Optional: sprinkle top or around the rim with chopped pecans or grated carrots.


Enjoy!


Thursday, September 5, 2013

Shark Cake

It's no secret my friend Ann likes to throw theme parties.  More people really should - they're such fun! The latest theme party happened a few weeks ago and was inspired by two HUGE cultural obsessions of the moment - Shark Week and Sharknado.

A shark party, you may ask? How fun could that really be?  Well let me assure you there's nothing like a crazy shark flick, silly costumes, thematic food, a giant remote controlled helium balloon shark, and crazy friends to make a fantastic evening!  I'll share a few pictures from the night later, but first I'm going to show you how to make a super-cute shark cake that will impress your guests (and not cause you too much of a headache).

This cake will serve between 12-16 people.  Use this post as a how-to if you'd like to make this cake yourself...or just enjoy the progress pictures!  It's kind of fun to see how it comes together!


Here's what you'll need

Three 8" square cakes
Buttercream frosting
Fondant
Black gel color
Brown gel color
Blue gel color
Red gel color
Crisco
Toothpicks
Wooden skewer
Rectangle cake board

And here's how to assemble your shark cake...


1 - Cut two of your 8" cakes so they are 5" x 8".

2 - Now you're going to stack your shark.  Place the two 5" x 8" takes on top of each other.  Then place the two extra strips you cut off together on top of those (to make three layers).

3 - Ice between these three layers, re-stacking.

4 - Spread some icing on a cake board and place your cake on top to secure it.  Then ice the outside of the your cake and refrigerate for 1-2 hours until icing firms.


5 & 6 - Now it's time to carve the cake!  First we're going to carve the shark's mouth.  It's a good idea to trace out your cuts with the tip of your knife before cutting - you can always take more cake off, but you can't add it back on!  This cut should start at the top of the 2nd layer of cake and curve down to the cake board, but should not go all the way through the cake.  You're actually going to cut a chunk out of each side, leaving about 3" in the middle, which will be the boat.

7 - Carefully angle the first layer until it reaches to top of the boat.  This angle should not be as steep as the mouth angle.

8 - Cut a 5" x 3" piece out of your third 8" square cake, and place it on the board at the back of your shark.  With the tip of your knife, trace the shape of your shark on one side of the cake.  Once you're happy with the curve of the shark, begin cutting pieces of cake off until you're happy with it!  Just remember - cut carefully - you can always take more off.


9 - Continue taking bit by bit off your shark - round the corners at the top (sharks aren't square!), smooth the edges of the cake...get creative - he's your creation!  Add a small (two layer) piece of cake to the front of the boat, so it extends about 1.5" past the top of the shark's mouth.  This is going to be the tip of the boat your shark is chomping on.  (If this little piece tries to fall off, use a toothpick to attach it to the rest of the cake.)

10 - Carefully shave away at the "boat" until it looks like a boat.  Your boat should be narrower at the tip, slope inward at the bottom, and have a lip (the railing) around the outside (so pull a little cake out of the inside top).  Cut away most of the excess board so it mirrors the body of the shark.  Do not cut the board to fit the shape of the boat too - it will be too flimsy.  We'll cover that up later!  Then ice the entire cake and place it in the refrigerator for 1-2 hours to set.


11- Mix grey fondant (white with a little black), until the color is consistent.  As you're working with fondant, you'll need to add a little Crisco to the ball so it doesn't stick to your hands.  Tape two sheets of wax paper on a flat surface and cover it with Crisco.  Roll out your grey fondant so it's about 1/4" thick, then carefully cover your shark body.  Using scissors or an exacto knife, cut the grey fondant so it ends at the edge of the sharks "lips".

12 - Mix pink fondant (white with a little red), until the color is consistent.  Roll out small pieces and fill in the area that would be the shark's open mouth.

13 - Mix light brown fondant (white with a little brown), until the color is consistent.  Roll out a piece and cover the entire boat in one move.  Cut three long, thin strips of the brown, that will be the upper rail and "boards" on the front of the boat.  Measure the appropriate lengths and attach to the boat by dabbing a little water on the back of the "board".  (Water helps fondant stick to fondant.)  Using a butter knife (or the side of the fork), gently draw the rest of the boards along the sides of the boat.  Place the cake back in the refrigerator for another hour while you work on steps 14 and 15.

Roll out more pink fondant and cover the rest of the inside of the mouth.


14 - Now it's time to make the accessories!  Roll out some white fondant and cut out teeth that are approximately 1/2" long.  Cut toothpicks in half and slide the toothpick halfway in the tooth.  Set these aside so they dry - the worst thing that could happen to your shark cake is for it to have floppy teeth!

15 - Roll out more grey fondant (thicker than the teeth).  Using a pizza cutter, cut out the shape of a shark fin.  Slide three toothpicks along the edge that will touch the shark so they are about 1/3 in the fin, 2/3 sticking out.  Let the fin set until it's completely dry.  (Second worst thing would be a floppy fin...)

Now it's time to make the mast for your boat.  Make a little "snake" of brown fondant.  Wrap the fondant carefully around about half of a wooden skewer and carefully roll it with your hands until it's no longer lumpy.  Cut out a rectangle piece of red fondant (add a little more red gel to the pink that's leftover from the shark's mouth) and attach to the top of the dowel using a little water.  If you have food-safe markers, feel free to decorate the flag.  I decided to go with a K, for Krentz (the last name of the friends throwing the party).  Nothing like having your shark eat the family boat of your hosts!  ;)

Once your shark's teeth are hard, stick each one around the rim of the shark's mouth.  Using small ovals of white fondant, place on the shark's eyes (attach with a dab of water).  You can draw on the pupil with a food-safe marker or by adding a smaller dot of black fondant.  Then, using a butter knife or edge of a fork, carefully etch in the shark's gills (three on each side).  Be careful not to cut through the fondant - you just want to etch them into his skin.

Then it's time to work on presentation.  Every shark should be in water, so we're going to do just that by covering a small, rectangle cake board (you can cut a larger one to the shape you'd like).  Mix light blue fondant (white with some blue), until the color is consistent.  Spread a very thin layer of white icing  on the cake board, roll out your blue fondant, and cover the board.  The fondant should  just go over the edges of the board, so use scissors to trim.

Spread more white icing down the middle of the covered board, and place your shark cake on top.


Color some of your buttercream icing with blue gel and fill a piping bag (or a Ziploc bag with one corner cut off).  I didn't use a piping tip for this - I just cut the tip off the disposable piping bag.  Fill your bag with the blue icing, and pipe waves around your shark.  Make sure your waves cover up the white board around your boat, then go down the sides of the shark.  The piping motion you'll be using is more pressure at the beginning, then less pressure as you pull away.

The final touches are the fin and boat mast - carefully stick the toothpicks into the shark's back, where you'd like the fin to live.  Then stick the end of the boat mast in right at the back of the boat, coming out at an angle.


Make sure your cake stays in the refrigerator until you're ready to serve.  Then remove about 45 minute to 1 hour before you're ready to cut in!

for fantastic recipes, cake how-to's, and diy projects!

Now for a few pictures from the party!


Now...go wow your friends!


Friday, July 5, 2013

Easy Flower Cupcakes

Happy Friday!  Today I had the pleasure of guest posting over at DIY by Design.  Judy's blog is one of the first I started following when I began blogging 10 months ago, so I was excited to have the opportunity to share a cupcake how-to while she's on vacation!

If you're new here, I hope you'll become a follower and stick around!

Follow Much Ado on Bloglovin...
...or Facebook...
...or Pinterest...
...or on Twitter...
...or your favorite reader!

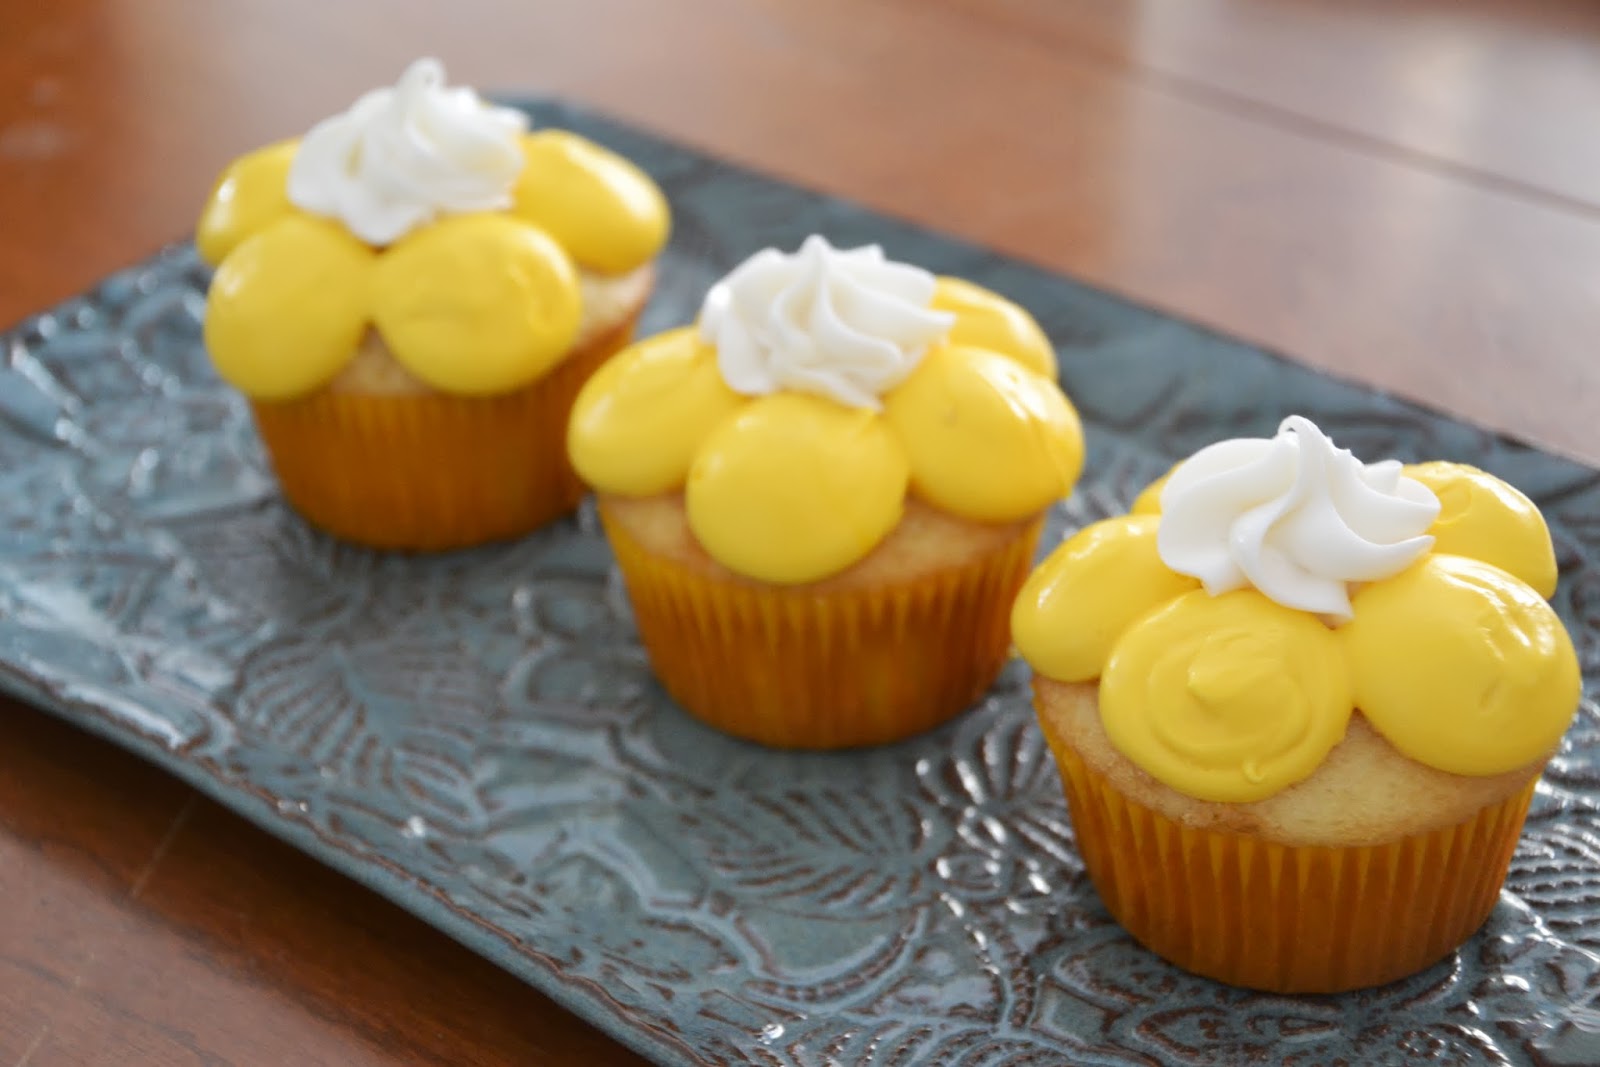
It's been a HOT week here in Boston - it finally feels like summer!  To celebrate, I decided to put together a simple summery flower tutorial.  There's no need for lots of "cake gear" or previous experience for this cute  flower.  It just boils down to 5 dots and a swirl!

Make several different colors of icing and you'll end up with a colorful bouquet of flowers at the end - perfect!

Check out the complete how-to here!


Interested in other cake tutorials?  Check out some of my other designs here, here, here, here, and here!

Thanks again, Judy, for letting me crash your blog!


Monday, May 6, 2013

Cake Decorating How-To: Berry Basket Cake - A fun summer cake!

Saturday night, my fabulous husband had his dissertation piece performed at Brandeis University!  To complete the dissertation (FINAL!) phase of his doctoral program, he has to write a dissertation piece and paper.  His piece was a song cycle for soprano, clarinet/bass clarinet, and piano, which I'll post recordings for once they come in.

I decided to make a cake for the concert's reception.  I was going to make a Star Wars cake (since the concert took place on May (the) 4th (be with you)), but realized a little late in the game I'd need more fondant than I had for that.  Instead, I decided to make a fun spring/summer cake.  Besides the flowers that are starting to bloom all around us, I'm most excited about berries coming back into season.  No more tasteless strawberries!  Because of this, I decided to make a "berry basket" cake!  It's a super cute cake topped with fresh berries.


Here's how to make the cake

Bake two 8" cakes.  Travis requested my Chocolate Stout Cake with chocolate buttercream icing.  Then...

1 - Once they cool, level the tops (cut off the rounded tops so they stack evenly!), and cut them into four inch squares.

2 - Stack one square on top of the other, with a generous layer of icing between!  This will be your basket.  I made three baskets for my cake.  Each basket should be on a piece of cardboard.  Once stacked, put your baskets in the refrigerator (uncovered) for 45-60 minutes.

3 - Now it's time to shape your baskets.  This is a pretty simple carve - the baskets are a little smaller at the bottom than top, so carefully whittle away the edges until they're smooth.  Then cut the middle out of the top, leaving a thin edge of cake.

4 - Here's what your baskets will look like once cleaned up a little!  If there are some holes, don't worry - you can fill them in with icing.  :)

Now to give your baskets a thin layer of icing.  You'll want to thin some of the icing you're using with a little water so it glides on easily.  Give the baskets a thin layer all over, then refrigerate for 1-2 hours to let the icing set.

Remove these from the refrigerator and add a second layer of icing.  Make this icing as smooth as possible, since fondant takes the shape of whatever is under it!  Make sure to trim the piece of cardboard down so they are the size of the bottoms of the baskets now too.  Then give these puppies another short stint in the fridge.


While the cake baskets are in the refrigerator, start mixing the fondant that will cover them.  I used "Kelly Green" Wilton gel coloring.  You'll need to add Crisco to the fondant as you mix the color in, or it will get very sticky and tough to work with.


Spread Crisco over some wax paper or (clean) counter top and roll out some of your green fondant.  If your baskets are the same size as mine (4"x4"x4.5"), that means you need a 16" x 5.5"


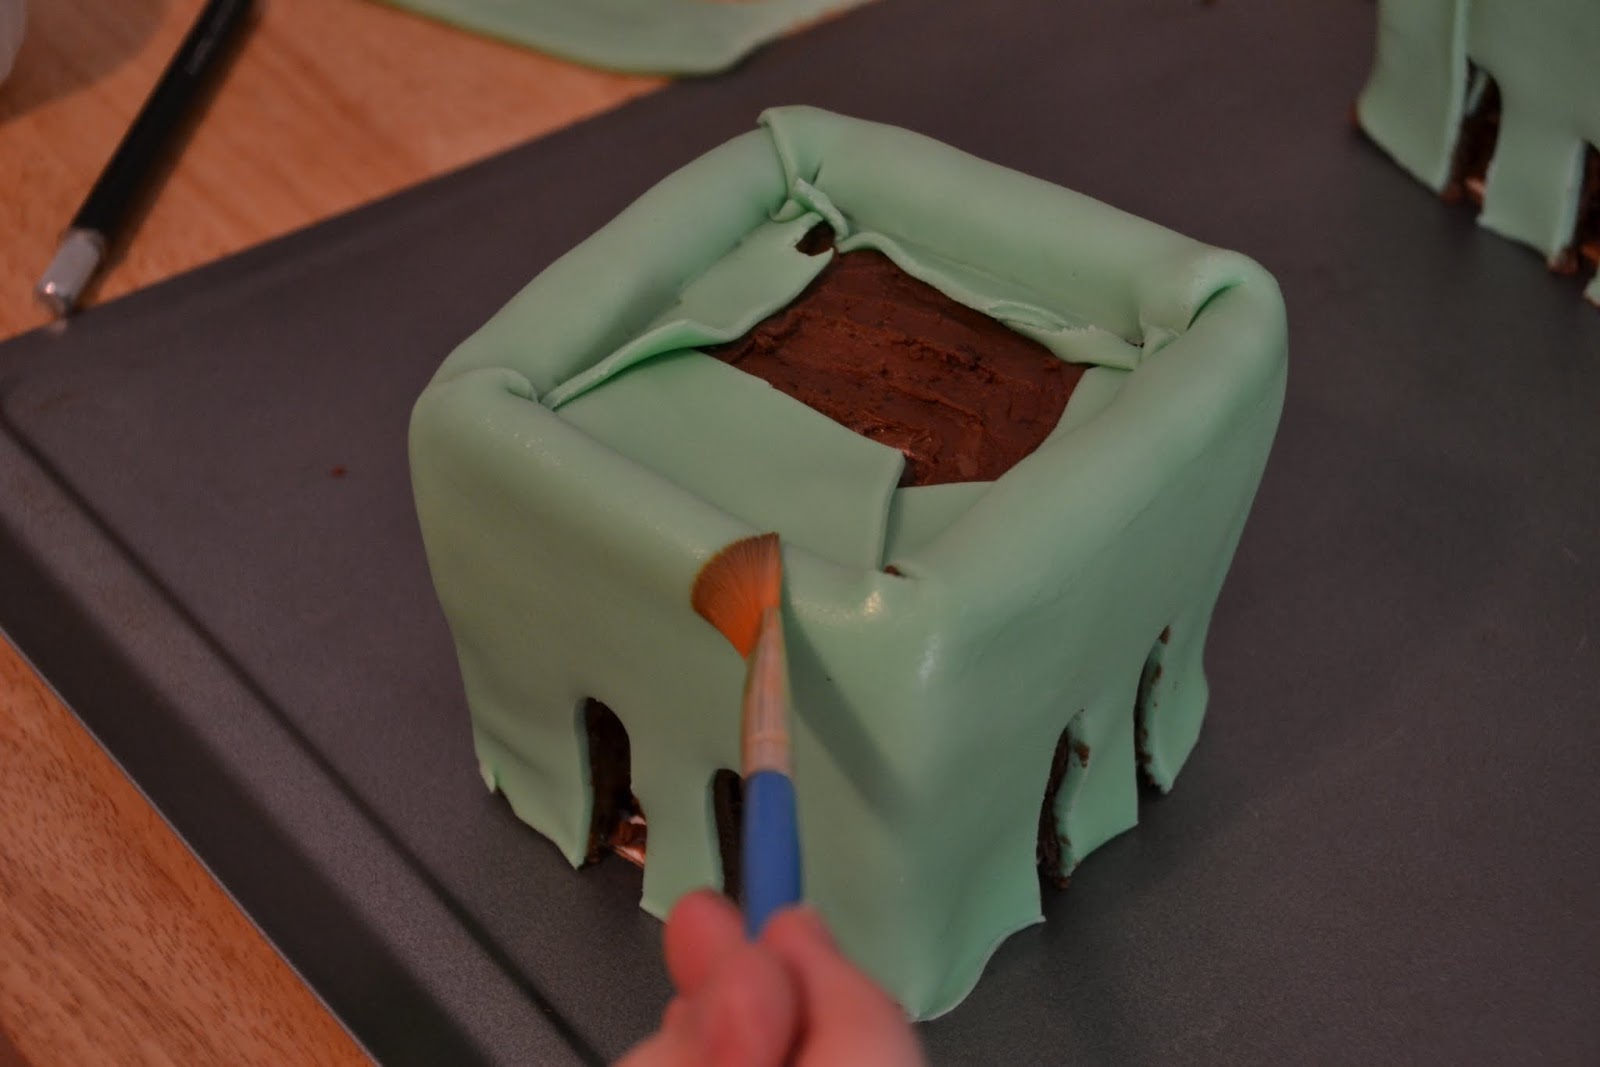
Wrap this around circumference of the basket and over the top lip.  The center of the top will still be exposed, but that's ok!  Clean up the "seam" with an exacto knife to keep things tidy.

Now it's time to cut the drainage holes around the bottom.  Remove the fondant and use a skinny tool (or toothpick) to pull out about 1/4" of cake.  Then, using a rounded tool (or your clean finger) and push the remaining cake to smooth out the cut-outs.


Now to add the top lip.  Roll out another, thinner strip.  Mine was about 1.5" wide and 16" long.  Fold the top 1/3 over on itself.

Then, with a paintbrush, brush water along the top 1/2" of the basket, where the strip you just made will go.  (The water helps fondant stick to fondant.)

Wrap the strip around the top of your basket, with the doubled-over edge sticking up above the top of the basket (facing in).


Then fill the tops of your baskets with your (washed and dried) fruit.  I chose strawberries, blueberries, and blackberries.  You could also use raspberries or cherries if you'd like!  Put the baskets back in the refrigerator.


Now it's time to make the board for them to sit on.  Presentation is always key to a great cake.  These would be nice sitting on a table as is...but are even better on a cute board to tie the entire thing together!  I decided to make a checkered tablecloth board.  I used a large, rectangle, piece of cardboard as the base.

Mix some red fondant (I used "No-Taste Red") and roll out each color and cut 1.5" squares.  Put a thin layer of clear piping gel on the board, then layer the squares in a checkered pattern!


Then place the baskets on your beautiful board with some more piping gel.  Then cut a (yet another) thin green strip about 1/4" wide and wrap it around the bottom of each basket.

Cake's done!  Now, add a few more berries around the bottom of each basket and impress your friends with your super cute cake.


This was a huge hit at the reception - no one guessed it was a cake until they were told!


Later this week, I'll tell you about our celebratory dinner out and post some recordings from the concert!  Check back for more!


Tuesday, March 12, 2013

Chocolate Stout Cupcakes

Last week I told you a little about my first wedding cake gig.  The bride and groom were having their reception at the Red Hook Brewery in New Hampshire, so they requested the cake have several tie-in's to beer.  They were:

1 - A cupcake tower with "glasses of beer" cupcakes.
2 - The wedding cake (instead of being your round tiered cake) would be a KEG cake!
3 - I was to find some way to incorporate beer into the cake.

I knew numbers 1 & 2 would be no problem, but was thrown for a loop when it came to a beer cupcake.  Nowadays this is pretty standard, but keep in mind this was early 2010.  There was no Cupcake Wars showing us the craziest combinations with their magnificent successes (and failures), so I did a little research.  After several trials and errors, I found the perfect recipe online, so I thought I'd share.


Ingredients

2 cups stout (I used Guinness)
2 cups (4 sticks) unsalted butter
1 1/2 cups unsweetened cocoa powder (preferably Dutch-process)
4 cups all purpose flour
4 cups sugar
1 tablespoon baking soda
1 1/2 teaspoons salt
4 large eggs
1 1/3 cups sour cream

Directions

Preheat oven to 350F.  Bring 2 cups stout and 2 cups butter to simmer in large saucepan over medium heat. Add cocoa powder and whisk until mixture is smooth.  Cool slightly.

Whisk flour, sugar, baking soda, and 1 1/2 teaspoons salt in a large bowl.

Using an electric mixer, beat eggs and sour cream in another large bowl to blend.

Add stout-chocolate mixture to egg mix and beat just to combine.

Add flour mixture and beat briefly on low.  Using a rubber spatula, fold batter until completely combined.

Bake in three 8" round cake pans for 35 minutes.  (This recipe also works well as cupcakes - just adjust the bake time.)

Top with your favorite frosting - I LOVE this with a cream cheese icing...PERFECT.


Monday, March 4, 2013

St Patrick's Day Beer Glass Cupcakes and Homemade Cupcake Wrappers

St Patrick's Day is almost here, so I thought I'd share some fun cupcake ideas with you that I've made in the past!

In the summer of 2011, I was commissioned to make my very first wedding cake.  I was so excited!  Then, as I met with the bride-to-be to talk about her big day, my excitement turned to utter GLEE.  This wasn't going to be your traditional wedding cake...no no!  The wedding reception was going to be at the Redhook Brewery in New Hampshire, so they wanted their cake to fit in with that theme.  As we talked more, we decided to incorporate their beer theme into the cake in three ways:

1 - A cupcake tower with "glasses of beer" cupcakes.
2 - The wedding cake (instead of being your round tiered cake) would be a KEG cake!
3 - I was to find some way to incorporate beer into the cake recipe itself (see recipe here).

Today I'm going to share the first component of this fun wedding's how-to, the "glass of beer" cupcakes, since they'd also work for St Patrick's Day.  They are super cute and super easy to make.


To make these, you'll need:

Baked cupcakes
Buttercream or cream cheese icing
Rose piping tip
Cupcake wrapper template
Large image of beer bubbles (multiple pages)

The trick to these "glass of beer" cupcakes is the beer bubble wrapper.  Custom cupcake wrappers are really a piece of cake (har har).  No need to buy them online or spend tons of money at Michael's..,just find some pretty paper and use a template to make your own.  There are lots of templates online - here's one you can use.  Since "beer bubbles paper" isn't on huge demand, I found an iStock image of bubbles, purchased it, and printed off 50 sheets at Kinkos.  Don't let yourself be held back by what's typical - there are TONS of images online you can buy the rights to.

Just print the template and cut out the cupcake wrapper shapes carefully.  You're not actually going to use what you cut out - you'll use the remaining sheet with the missing pieces instead.

Lay your template over the back side of the pretty paper, and trace the wrapper shapes onto the paper.  Then just cut out your wrappers!

For an extra flair, you can use decorative scissors when cutting the top edge, or a paper punch to add more detail.

Once your wrappers are sufficiently embellished, wrap them around the cupcake to see how tight they need to be.  Unwrap, tape at the same spot you measured earlier, and then drop your cupcake in it's new wrapper!


Once I had the outside of the mug done (aka the cupcake wrappers), it was time to add the frothy top!  To make the froth, I used a small rose tip and filled my piping bag with the white icing.  The frosting technique for this is pretty loose - just pipe "fluffy" swirls on top to resemble what would be the froth.  Just try to keep the frosting pretty low - froth doesn't go over the top of your beer mug, so your icing shouldn't either.


Once the cupcakes were transferred to the cupcake tower, it looked like a tower of beer mugs!  Such a fun treat!


Check back soon, as I'll be sharing the Chocolate Stout Cake recipe I used.  It's so good I prefer it to every other chocolate cake out there.