Thursday, April 25, 2013

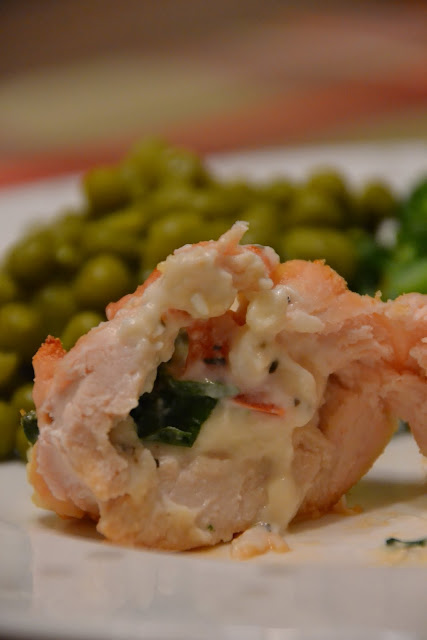
Cheesy Stuffed Chicken Breasts

I made the most delicious stuffed chicken last night.  For the past week, with the bombings and general feeling of uneasiness around Boston, I haven't been in the mood to cook much.  I quickly exhausted all of our easy weeknight go-to's, so we were in need of something interesting for dinner.  

When we first moved to Boston, we lived down the street from an Uno's Chicago Grill.  My favorite thing to get there was their "Baked Stuffed" - a chicken breast stuffed with cheese, broccoli, and tomato.  Feeling nostalgic,  I decided to put my own spin on the dish, complements of the Laughing Cow and some spinach.  Laughing Cow wedges are perfect for stuffed chicken breasts - they are pre-portioned into 35 calorie wedges and spread easily, so you can make sure there's cheesy goodness in each bite.  These stuffed chicken breasts are bursting with flavor - you'll LOVE them.  Here's what you need.


Ingredients  (Serves 2)
2 chicken breasts
4 Laughing Cow Light Swiss Cheese Wedges
Spinach
Tomato (diced with seeds removed)
Garlic Powder
Onion Powder
Basil
Salt

Directions

Pound chicken breasts until they are about 1/4" thick.  To do this, place each breast between sheets of wax paper and pound lightly (starting in the center, moving outward) until thin.  This is where I learned I was missing a key piece of equipment - the meat pounder - so I used a jewelry hammer.  :)  It worked!


Lay flattened chicken breasts on a flat surface, bottom-side up.  Sprinkle with garlic and onion powder, basil, and salt.  

Then add filling.  Each chicken breast gets two Laughing Cow wedges.  (At only 35 calories per wedge, you can afford LOTS of cheese!)  Spread cheese across entire chicken breast.  Cover in spinach, then sprinkle tomato pieces.
Make sure you spread filling over the entire breast - I changed mine after the picture...sorry!

Now it's time to roll it up!  Roll from one of the short ends, so you have a "stubby" chicken wrap (not a long one).  Once you have it rolled, use several toothpicks to keep edges sealed.  Tuck ends together and secure so the cheese doesn't leak out while cooking.  Sprinkle wrapped breast with garlic and salt.

Line a baking dish with foil and spray with pam.  Then bake at 375 for 25-30 minutes, or until done.  


Carefully remove toothpicks and serve!


Enjoy!


Tuesday, April 23, 2013

Key Lime Fruit Dip

This weekend I made a huge fruit salad to take to an afternoon tea my friend Ann threw.  I made a lot more than I needed to bring, so I kept some at home for the week.  Strawberries, blueberries, blackberries, and grapes...so yummy!  I like eating fruit with yogurt some evenings, but decided to whip up a fruit dip on Monday to change things up a little bit.  Most fruit dips are so packed with calories it totally undoes the fact that you're eating fruit.  Cream cheese... Marshmallow Fluff...frozen lemonade...chocolate...sugar...sounds delicious, but is crazy high in calories!

What I came up with is much lower in calories, and still delicious - a Key Lime Fruit Dip!  The entire recipe is 270 calories, but you shouldn't eat the whole thing.  (Even though you'll want to.)  Share with 4 friends, and it's just 68 per serving!


Ingredients

1 cup Yogurt (Yoplait Lite 'n Fit)
1/2 cup Light Cool Whip
1/4 cup Light Cream Cheese
Zest of one lime
Squeeze of lime juice

Directions

Combine first three ingredients in a bowl and cream together until smooth.


Mix in lime zest, then give the lime a squeeze into the mixture.  Add more or less of the lime juice to your taste!


While you're here...wanna see some pictures from the tea?  I thought you might.  :)  The table was beautiful and food was fantastic!  We decided this may be the summer of tea parties - sounds like fun, doesn't it?


Ann and the table!
Allyn got up to get some water, and Amelia hopped right up into her chair - she wanted to have tea too!


Happy Day!


Monday, April 22, 2013

The Most Fabulous Sox Game Ever

Saturday we went to our first Red Sox game of the season.  After the rough week we had here in Boston, it was a much needed chance to get out of our heads and have some FUN in our city.

Our friend, Brooks, was able to get fantastic seats for us - standing room on the GREEN MONSTER!  Travis and I have sat all over the park, but the Green Monster was the one place we never thought we'd be able to sit.  It was such a fun place to watch the game...and what a game it was!

We got there a little early so we could secure a spot at the 'bar'.  Standing room 'seats' are on the top row of the monster and have a bar ledge for you to lean and eat on.  With Travis' back acting the way it is right now, this was actually better - he would have been miserable in those tiny wooden chairs.


The view from the monster!


Wally stamp!
Before the game, the Sox put on a beautiful ceremony honoring the Marathon bombing victims and the law enforcement officers that put an end to the terror last night.  After a video tribute, they brought out people that characterized this past week to throw the first pitch.  This included a victim of the bombing that had been released days ago, a first responder that jumped into action from his table at a restaurant nearby, and the Hoyts...Boston Marathon icons.  Each threw a pitch, while the Mayor, Governor  and many police officers formed an arch around them.


Then the game started!


If you've ever been to a game at Fenway, you know everyone looks forward to the 8th inning, when it's time to sing "Sweet Caroline".  This time, they announced they had a surprise for everyone.  Major League Baseball teams across the country had showed their support for Boston this week by adding some of our iconic songs to their games (like the "Cheers" Theme and "Sweet Caroline").  When Neil Diamond (who wrote "Sweet Caroline") heard this...and that the suspect was captured Friday night...he hopped on a plane to come sing "Sweet Caroline" AT the game!  So cool!!


It was a fantastic day and just what we needed to start getting over the last week.


Friday, April 19, 2013

Sweet and Spicy Roasted Chickpeas

Husband is a huge hummus fan.  When we first got a Costco membership, I quickly realized we were making up for the membership fee in the money we were saving on hummus alone.  He's a huuuuuge fan.  Since hummus is such a big hit with him, I decided to give roasted chickpeas a try this week.

Since I'm not normally a huge fan of spicy things (I'm a huge wimp), I decided to make two kinds of roasted chickpeas - one set spicy, one set sweet.  Besides being a fantastic snack (they're low in fat and high in fiber), these are awesome because of how easy they are to make.  It's just a mix, stir, and roast recipe, and could easily be thrown in the oven after dinner comes out.


Ingredients

Spicy Chickpeas
1 tablespoon garlic powder
1 tablespoon cumin
1/2 tablespoon paprika
1/2 tablespoon hot Mexican-style chili powder
1 teaspoon salt
1 tablespoon olive oil
Large, 1 pound 13 ounce, can chickpeas (garbanzo beans) 


Sweet Roasted Chickpeas
3 tablespoons brown sugar
1 heaping teaspoon cinnamon
1 teaspoon olive oil
2 teaspoons honey
Large, 1 pound 13 ounce, can chickpeas (garbanzo beans)


Directions

Strain and rinse chickpeas, then transfer to a large bowl.  Pour wet ingredients (olive oil and/or honey, depending on which you're making) over chickpeas and gently toss lightly.


Mix spices in a small dish to combine.  

Spice mix for "Spicy Chickpeas"

Cinnamon/Sugar Mix for the "Sweet Chickpeas"

Sprinkle dry ingredients over chickpeas and gently toss until they're evenly covered.

Spicy Chickpeas

Sweet Chickpeas

Cover cookie sheet (with sides) with foil, then spread chickpeas evenly.  Bake at 400 for 25-30 minutes, or until crispy and golden.  Toss chickpeas halfway through so they don't stick.


Enjoy!